Imagine not doing a full coop clean-out from October to April — and having your coop smell *better* than your neighbor’s cleaned-weekly setup. That’s not a fantasy. That’s the deep litter method, and it’s the closest thing to a cheat code in chicken keeping.
Instead of removing soiled bedding every week, you keep adding fresh bedding on top. The lower layers slowly compost in place, generating gentle heat, hosting beneficial microbes, and turning chicken droppings into something useful instead of something gross. Come spring, you shovel out a coop full of black gold for the garden.
Here’s exactly how to do it.
What the Deep Litter Method Actually Is (and Isn’t)
Let’s clear up confusion first, because “deep litter” gets mixed up with “never cleaning the coop,” and those are very different things.
Deep litter IS:
- A managed composting system inside your coop
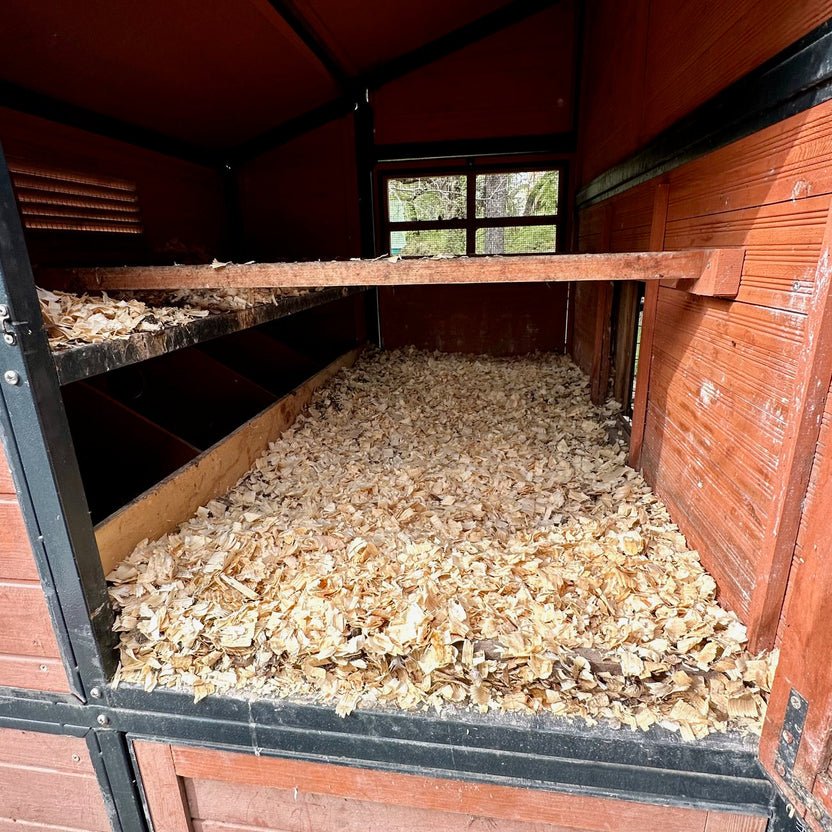
- 8–12 inches of carbon-rich bedding built up in layers over months
- An active process — you stir it, add to it, and monitor moisture
- A winter strategy that generates a few degrees of free warmth
Deep litter IS NOT:
- Piling up bedding and ignoring it (that’s just a dirty coop)
- A substitute for ventilation (moisture still needs to escape — see https://amesfamilyfarm.com/winterize-chicken-coop-checklist/)
- Suitable for tiny coops with no floor space or coops with dirt floors that flood
Think of it as running a slow compost pile that your chickens live on top of. The chickens do the turning for you every time they scratch.
The 5-Step Deep Litter Process
Step 1: Start with a clean, dry floor
Timing matters: start your deep litter in the fall, on top of a freshly cleaned coop. Scrape the floor bare, let it dry completely, and make sure you have no leaks. Starting on a damp floor is the number one reason deep litter fails — you’re building a compost system, not a swamp.
Wood, concrete, or vinyl floors all work. Dirt floors can work too, but only if your coop stays bone-dry; otherwise the litter wicks ground moisture up and goes anaerobic (more on that in the troubleshooting section).
Step 2: Lay a 4–6 inch base layer
Your base layer should be coarse, carbon-heavy material that creates air pockets:
- Pine shavings (kiln-dried, large flake) — the gold standard
- Chopped straw — good, but mats down faster; mix with shavings
- Dried leaves — free and excellent if you have them; shred first
Avoid cedar shavings (the aromatic oils irritate chicken lungs) and sawdust (too fine — it compacts and holds moisture instead of composting).
Spread 4–6 inches evenly across the whole floor. Toss in a handful of scratch grains — the chickens will gleefully turn the bedding hunting for them, which kickstarts the whole system.
Step 3: Add fresh layers instead of cleaning out
This is the whole method in one sentence: when the top looks soiled, add 1–2 inches of fresh bedding on top. Don’t remove anything.
Every 1–2 weeks through fall and winter, toss on another thin layer. The droppings get buried, the carbon bedding balances the nitrogen in the manure, and the microbial party underneath keeps working. The chickens’ scratching keeps it aerated — which is exactly what compost needs.
Aim to build to 8–12 inches total depth by midwinter. That depth insulates the floor, cushions feet, and gives the composting layers enough mass to work.
Step 4: Stir and monitor (5 minutes a week)
Once a week, take a rake or pitchfork and turn the top few inches, especially under the roosts where droppings concentrate. You’re looking for three things:
- Smell: It should smell earthy, like a forest floor. If it smells like ammonia, add more carbon bedding immediately and check your ventilation.
- Moisture: Grab a handful and squeeze. It should feel like a wrung-out sponge — damp, not wet. Soggy litter goes anaerobic and stinks. Fix leaks, add dry bedding, improve airflow.
- Activity: You should see the bedding breaking down into smaller, darker pieces at the bottom. That’s compost happening.
If a spot under the roost gets extra nasty, just bury it with a thick layer of fresh shavings rather than scooping it out. The system handles it.
Step 5: Harvest the black gold in spring
When winter breaks, the payoff arrives. Shovel out the entire coop — what’s underneath the fresh top layers will be dark, crumbly, earthy-smelling compost-in-progress.
Important: It’s not finished compost yet. Fresh-out-of-the-coop deep litter is still “hot” with nitrogen and can burn plants. Pile it up, let it cure for 4–8 weeks (turn it once or twice), and then it’s ready for the garden. Pair this with your regular compost routine from https://amesfamilyfarm.com/composting-101-beginners-guide/ and you’ll never buy bagged fertilizer again.
Then clean the coop, let the floor dry, and start the cycle over next fall.
Bedding Layers: What Goes In and When
Here’s a simple layering rhythm for a full season:
1. October: 4–6 inches of pine shavings (base layer)
2. November: 2 inches of dried leaves or straw
3. December: 2 inches of pine shavings
4. January: 2 inches of straw (extra insulation for the coldest month)
5. February: 2 inches of pine shavings
6. March: Top off with whatever’s on hand as needed
Alternate coarse and fine materials when you can — the variety feeds different microbes and prevents matting. And always keep a spare bag of shavings in the coop corner; the biggest deep-litter failures happen when people run out of bedding mid-January and stop adding layers.
Troubleshooting: When Deep Litter Goes Wrong
It smells like ammonia. Add carbon (shavings, leaves, straw) immediately — a lot of it. Then check ventilation. Ammonia means too much nitrogen and not enough air, and it’s hard on chicken lungs.
It’s soggy or matted. Find the moisture source: roof leak, spilled waterer, or wicking from a dirt floor. Fix the source, stir in dry bedding, and consider moving the waterer to the run.
It’s not breaking down. Usually means it’s too dry or too cold, or the layers are too thin. Mist it lightly with water (yes, really), make sure you have 8+ inches of depth, and toss scratch grains to get the chickens turning it.
Flies in warm spells. A thin top-dressing of food-grade diatomaceous earth or agricultural lime (not hydrated lime) knocks them back. Flies mean the top is too moist — add dry bedding.
Deep Litter vs. Regular Cleaning: Honest Comparison
| | Deep Litter | Weekly Clean-Out |
|—|—|—|
| Winter labor | ~5 min/week | 30–45 min/week |
| Bedding cost | Higher upfront, less over season | Steady all year |
| Coop warmth | Slight composting heat bonus | None |
| Spring payoff | Free compost | Bag of droppings to compost anyway |
| Risk if neglected | Ammonia, anaerobic stink | Just a dirty coop |
| Best for | Fall through spring | Summer, small coops |
Many keepers run deep litter October through March and switch to simple shallow bedding with frequent clean-outs in summer, when heat makes composting litter harder to manage. That’s a perfectly good hybrid.
FAQ: The Deep Litter Method for Chickens
How deep should deep litter be?
Start with 4–6 inches and build to 8–12 inches by midwinter. Less than 6 inches doesn’t compost effectively; more than 14 inches can restrict floor space in small coops.
Does the deep litter method really heat the coop?
It generates a small amount of heat — a few degrees, mostly at floor level. It’s a nice bonus, not a furnace. The real winter benefits are insulation from the cold floor and fewer drafts from constant door-opening for clean-outs. Don’t rely on it instead of proper winter prep (https://amesfamilyfarm.com/winterize-chicken-coop-checklist/) or expect it to replace heat in extreme cold (https://amesfamilyfarm.com/do-chickens-need-heat-in-winter/).
Can I use the deep litter method with chicks?
Not for the first few weeks. Chicks need clean, shallow bedding so you can monitor droppings for illness. Start deep litter once they’re fully feathered juveniles in the main coop.
What bedding is best for deep litter?
Kiln-dried pine shavings are the most forgiving for beginners. Straw works but mats; leaves are great if shredded. Many experienced keepers mix all three. Never use cedar or fine sawdust.
Will deep litter make my coop smell?
Done right, it smells *less* than a conventionally cleaned coop — earthy, not ammonia-y. If it stinks, something’s wrong (too wet, not enough carbon, poor ventilation), and the fix is always the same: add dry carbon bedding and check airflow.
Conclusion
The deep litter method trades one big spring clean-out for five minutes of weekly maintenance all winter — and pays you back in free heat, healthier air, and a coop full of garden-ready compost. Start this fall on a clean, dry floor, layer carbon bedding all season, and let the chickens and microbes do the work.
Your action step: Next time you’re at the feed store, grab two extra bags of pine shavings and a bag of straw. That’s literally all the supplies you need to start. Your spring garden will thank you.
📌 Pin this guide for October — future you, standing in a warm-smelling coop in January while the neighbor scrapes frozen droppings, will be glad you did.