Nothing makes a chicken keeper’s stomach drop like finding mites. Your hens look a little ragged, egg production dips for no obvious reason, and then one evening you part the feathers near a vent and see them — tiny crawling specks where there should be clean skin. Take a breath. Mites are one of the most common problems in backyard flocks, and they are very beatable if you act fast and treat the whole system, not just the birds.
I have fought mites twice in six years of keeping chickens. The first time I under-treated and they came roaring back. The second time I did it right — birds, coop, and follow-up — and they were gone for good. This guide is the second-time version: everything I wish I had known the first time.
First: Which Mite Are You Dealing With?
There are two mites that plague backyard chickens, and knowing which one you have changes where you look:
- Northern fowl mites live on the bird, usually clustered around the vent, under the wings, and near the tail. They feed day and night, and heavy infestations leave the skin around the vent dark, dirty-looking, and irritated. These are the ones you will see when you part feathers in daylight.
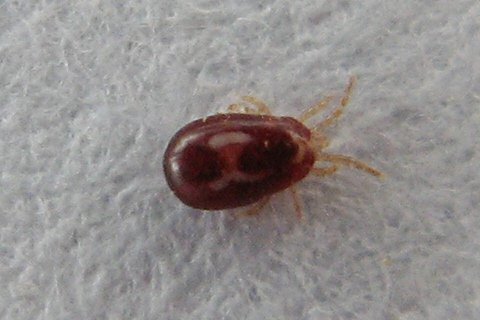
- Red mites (roost mites) are sneakier. They hide in cracks and crevices of the coop during the day — under roosts, in wall joints, behind nest boxes — and come out at night to feed on roosting birds. If your hens look fine during the day but seem restless on the roost at night, suspect red mites. Check the coop with a flashlight after dark and look for tiny reddish specks moving along the roosts.
Both cause the same fallout: anemia (pale combs and wattles), feather loss, weight loss, and a drop in laying. In young chicks or heavy infestations, mites can genuinely threaten a bird’s life — this is not a cosmetic problem.
📌 Pin this: Check for red mites at NIGHT with a flashlight — they hide in coop cracks by day and feed after dark. Daytime checks miss them completely.
How to Confirm You Have Mites
Before you treat anything, confirm the diagnosis. Here is my inspection routine:
- Pick up a hen after dark (they are calm and easy to handle on the roost). Part the feathers around the vent and under the wings. Look for tiny moving specks, clusters of grayish debris at feather bases, or irritated reddish skin.
- Run a white paper towel along the underside of the roosts at night. Red mites show up as tiny red or gray smears on the white towel.
- Check the coop structure. Pull out nest box bedding and look in corners and joints. Tap roost boards over a white sheet of paper — falling specks are a giveaway.
- Look at the birds’ overall condition. Pale combs, ragged feathers near the vent, and hens that seem itchy or restless are all supporting evidence.
One caution: do not confuse mites with lice. Lice are larger, slower, beige-colored, and they lay visible egg clusters at feather bases. The treatment below handles both, but it helps to know what you are looking at.
The Treatment Plan: Birds, Coop, and Timing
Here is the mistake I made the first time: I dusted the birds and called it done. The mites came back in three weeks because I never broke the egg cycle and never treated the coop where the next generation was waiting. The full plan has three parts, and all three matter.
Part 1: Treat the Birds
Work at night when the birds are calm on the roost. Wear gloves and a dust mask — poultry dust is not something you want in your lungs.
- Use a poultry-approved permethrin dust or spray, following the label directions exactly. Dust or spray each bird thoroughly, working the product down to the skin around the vent, under the wings, and through the fluff near the tail. The label is the law here: correct product, correct dose, correct application.
- Do not skip any bird. Treating five out of six hens just gives the mites a refuge. Every bird in the flock gets treated on the same night.
- If you use a spray, keep it off the face and avoid soaking the bird — damp chickens in cool weather are a chilling risk.
Part 2: Treat the Coop (This Is Where Wars Are Won)
The coop is the reservoir. Strip it completely:
- Remove all bedding and nest material — bag it and get it away from the coop (burn it or send it off in the trash; do not compost it near the run).
- Scrub roosts, nest boxes, and walls. Pay special attention to cracks, joints, and the undersides of roosts — that is prime red-mite real estate.
- Apply your poultry-approved coop treatment to every crack and crevice per the label, especially roost supports and wall joints. Let it dry fully before re-bedding.
- Re-bed with fresh, clean bedding. This is a good moment to reconsider your bedding system — I break down the options in my chicken coop bedding options comparison, because some bedding types harbor fewer pests than others.
Part 3: The Follow-Up (The Step Everyone Skips)
Mite eggs survive the first treatment. They hatch in roughly a week, which is why you must repeat the entire treatment — birds and coop — 7 to 10 days later. This second round kills the newly hatched generation before it can lay eggs, and that is what actually breaks the cycle. I skipped this the first time. Do not be me.
After the second treatment, inspect weekly for a month. If you find nothing for four straight weeks, you can declare victory.
What About Diatomaceous Earth?
You will hear a lot about food-grade diatomaceous earth (DE) in chicken groups. Here is my honest take after trying it: DE has some desiccant effect on soft-bodied insects and I do mix a little into dust-bath areas as a supplement, but it is not a standalone cure for an active infestation. When you have confirmed mites, use a proper poultry-labeled treatment and save the DE for maintenance. An infestation is a “bring the real tools” situation.
Once the infestation is fully cleared, though, DE earns its place in the maintenance routine — a cup mixed into the dust bath and a light sprinkle in fresh nest boxes between cleanings helps make the coop less inviting to the next wave of hitchhikers.
Similarly, herbs like mint and lavender in nest boxes smell lovely and the hens seem to enjoy them, but they will not resolve mites on their own. Think of them as coop feng shui, not pest control.
Prevention: Making Your Coop Mite-Hostile
Once you are mite-free, a few habits keep it that way:
- Quarantine new birds for at least two weeks before introducing them to the flock. New birds are the number one way mites arrive. Inspect them thoroughly during quarantine — this single habit would have prevented both of my infestations.
- Provide a dust bath. Chickens are excellent at self-maintenance when given the chance. A dry, sheltered dust-bath area with loose soil or sand lets them work on external parasites themselves.
- Inspect monthly. Make the vent-and-roost check part of your routine — I do mine on the first Saturday of the month. Catching mites at ten mites instead of ten thousand is the whole game.
- Keep wild birds out of the coop. Wild birds carry poultry mites. Covered runs and tidy feed storage (no spilled feed attracting visitors) reduce the traffic.
- Clean on a schedule. Regular bedding changes and periodic deep cleans deny mites the undisturbed habitat they love. If you run the deep litter method chickens, stay disciplined about adding fresh material on schedule — a neglected deep-litter pack is mite paradise.
Seasonal timing matters too. Mite populations explode in warm weather, so late spring and summer are when your monthly checks matter most. And when you do your fall coop prep, fold the inspection into it — my winterize chicken coop checklist includes a pest check for exactly this reason, because going into winter with a hidden infestation means months of suffering while the birds are cooped up tight.
When to Worry More
Most mite infestations resolve with the two-round treatment above. Call in more help — an experienced poultry vet or your local extension office — if: birds are severely anemic (white combs, lethargic, not eating), chicks are dying, or two full treatment rounds have not knocked the population down. There is no shame in escalating; extension offices deal with this constantly and can confirm your mite species under a microscope.
Your Turn
Tonight, after dark, take a flashlight to the coop and run the paper-towel test along the roosts. It takes five minutes and it is the single highest-value check in chicken keeping. If it comes back clean, you have peace of mind. If it does not, you caught it early — and now you know exactly what to do.